How To Heat Press DTF Transfers on T-Shirts Step by Step Print Instructions | Warm Peel [UPDATED 2024]
![How To Heat Press DTF Transfers on T-Shirts Step by Step Print Instructions | Warm Peel [UPDATED 2024]](http://www.transfersuperstars.com/cdn/shop/articles/2-Rolled-Mockup-v.3.jpg?v=1698828322&width=1100)
Mastering DTF Transfers: The Ultimate Guide to Flawless T-Shirt Printing in 2024
By Phil, Co-founder of Transfer Superstars

Quick Navigation
Introduction: Revolutionizing Custom Apparel with DTF
Welcome to the cutting-edge world of Direct-to-Film (DTF) printing! As we stride into 2024, DTF technology continues to redefine the custom apparel industry, offering unparalleled vibrancy, durability, and versatility. Whether you're a seasoned print shop owner or a creative entrepreneur just starting out, mastering DTF transfers is your gateway to producing stunning, professional-quality custom t-shirts.
Key Benefits of DTF Printing:
- High-resolution, full-color designs
- Excellent durability and wash-fastness
- Versatility across various fabric types
- Cost-effective for both small and large runs
- Eco-friendly compared to traditional methods
Learn more about the advantages of DTF over other printing methods.
Understanding DTF & Heat Transfers: The Technology Behind the Magic
DTF printing involves creating designs on a special film, which is then transferred onto garments using heat and pressure. This method offers several advantages over traditional techniques like screen printing and sublimation.
For an in-depth look at the DTF process, check out our comprehensive DTF printing guide.
Step-by-Step Guide: Mastering DTF Transfer Application
Essential Equipment Checklist:
- Heat press machine
- DTF transfers
- Garments to print on
- Teflon sheet or parchment paper
- Heat-resistant tape
- Lint roller
- Infrared thermometer (recommended)
1. Prepare Your Workspace
Ensure your heat press is clean, calibrated, and preheated to the correct temperature (typically 300°F / 149°C for cotton garments).
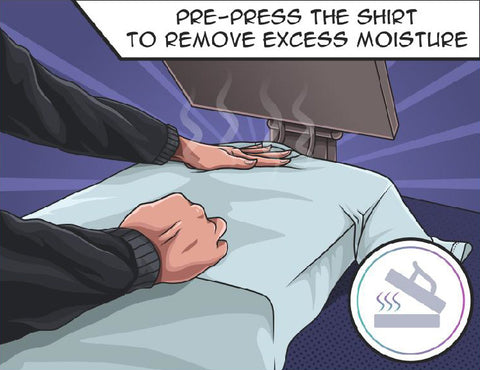
2. Prepare the Garment
Pre-press the garment for 5-10 seconds to remove moisture and wrinkles. Use a lint roller to remove any debris.
3. Position the Transfer
Place the DTF transfer on the garment, image side down. Use heat-resistant tape to secure it in place if needed.

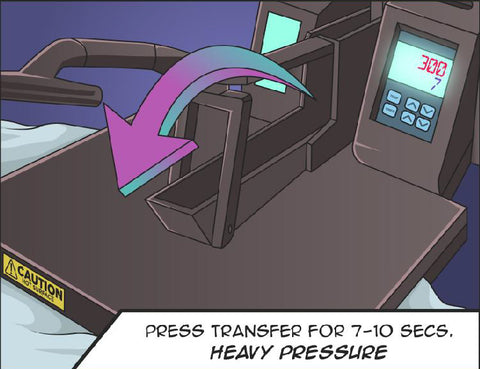
4. Apply Heat and Pressure
Cover the transfer with a Teflon sheet or parchment paper. Press for 10-15 seconds at medium pressure (40-60 PSI).
5. Peel the Carrier Sheet
Allow the transfer to cool for 10-15 seconds, then peel off the carrier sheet at a 45-degree angle.

6. Post-Press (Optional)
For maximum durability, cover the design with a Teflon sheet and press again for 5-10 seconds.

For more detailed instructions, visit our step-by-step DTF application guide.
Advanced DTF Printing Techniques
Multi-Layer Printing
Create depth and texture by applying multiple layers of transfers. Press each layer individually, using a light tack press between layers.
Specialty Fabrics
For moisture-wicking or performance fabrics, adjust your temperature and pressure settings. Use a heat press pillow to ensure even pressure on textured surfaces.
Pro Tip: Powderless DTF
Consider exploring powderless DTF technology for even softer prints and simplified application. While slightly more expensive, powderless transfers can produce exceptional results on a wide range of fabrics.
Explore more advanced DTF techniques to take your printing to the next level.
Troubleshooting Common DTF Issues
| Issue | Possible Cause | Solution |
|---|---|---|
| Incomplete Transfer | Insufficient heat or pressure | Increase temperature or pressure; ensure even pressure distribution |
| Cracking or Peeling | Improper application or fabric incompatibility | Adjust settings for fabric type; consider a post-press |
| Color Fading | Excessive heat | Reduce temperature or pressing time |
For more troubleshooting tips, check out our comprehensive DTF troubleshooting guide.
Frequently Asked Questions
What's the ideal temperature for DTF transfers?
For most cotton garments, 300°F (149°C) is ideal. Adjust to 285°F (141°C) for polyester or blends.
Can I use an iron instead of a heat press?
No, a heat press is essential for even heat and pressure distribution. Irons cannot provide consistent results.
How long do DTF prints last?
When properly applied, DTF prints can last for 50+ washes without significant fading or cracking.
Final Thoughts
Mastering DTF transfers opens up a world of possibilities in custom apparel printing. With practice and attention to detail, you'll be creating professional-quality prints that stand out in the market. Remember to stay updated with the latest DTF technologies and techniques to keep your business at the forefront of the industry.
Ready to take your DTF printing to the next level? Explore our advanced tutorials and resources at TransferSuperstars.com!